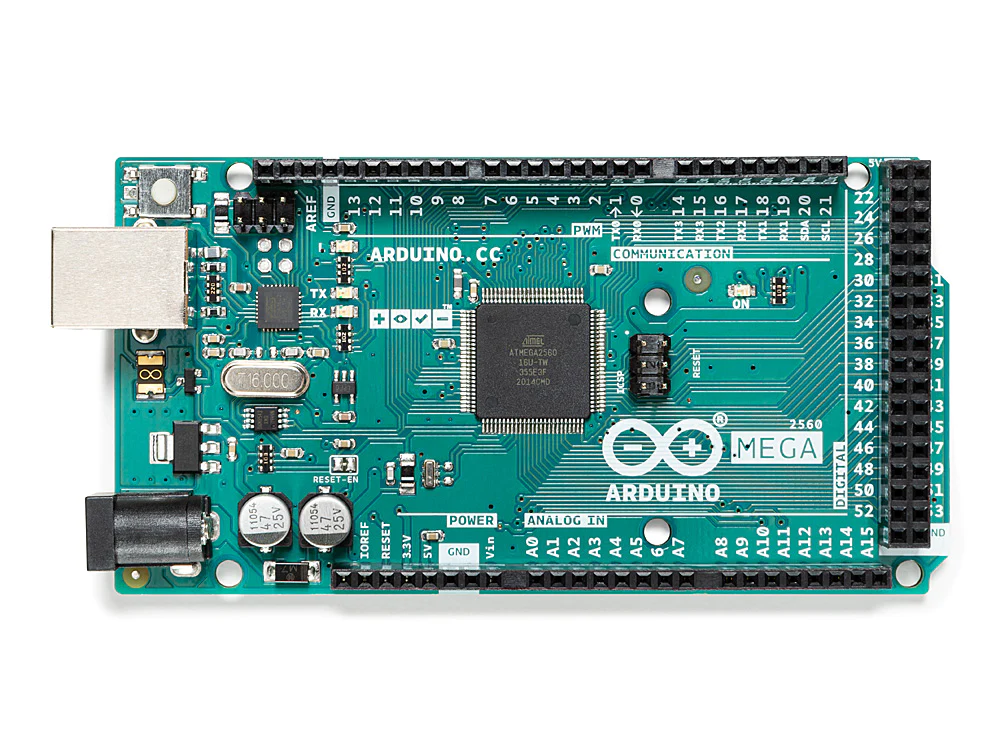
The Arduino Mega 2560 Rev3 is a big electronic board that makes it easy to work on projects with a lot of components. It has a special kind of tiny computer inside that does all the work for the board. We can write programs for it. This board has many pins where we can connect different electronic parts. It’s like the board’s way of talking to other things. The board also has a large storage space where we can keep our programs safe.
To program this board, we need some specific software and a USB cable to send the program to the board. In simple words, the Arduino Mega 2560 Rev3 is a big electronic board that makes it easy to work on projects with lots of parts. It has a small computer inside that helps it do things. We can write programs for it, and it can talk to other electronic parts.
মেগা 2560 রেভিশন 3 একটি বড় ইলেকট্রনিক্স প্রোজেক্টের জন্য। এটি তৈরি করা হয়েছে যাতে বেশি কম্পোনেন্ট যুক্ত করতে পারি। এই বোর্ডে একটি বিশেষ ধরণের মাইক্রোকন্ট্রোলার রয়েছে, যা বোর্ডের মধ্যে সব কাজ করে। এই মাইক্রোকন্ট্রোলারের মাধ্যমে আমরা প্রোগ্রাম লেখতে পারি। এই বোর্ডে বেশি কম্পোনেন্ট যুক্ত করতে পারি কারণ এখানে অনেক ডিজিটাল ও এনালগ পিন রয়েছে। এই পিনগুলির মাধ্যমে আমরা বিভিন্ন ইলেকট্রনিক উপাদানে যোগাযোগ করতে পারি। এই বোর্ডে একটি ফ্ল্যাশ মেমরি রয়েছে, যেটি আমাদের প্রোগ্রাম সংরক্ষণে সাহায্য করে। এর মাধ্যমে আমরা সংযুক্ত উপাদানে নিজেদের প্রোগ্রাম রাখতে পারি। এই বোর্ডটি প্রোগ্রাম করার জন্য কিছু নির্দিষ্ট সফটওয়্যার এবং ইউএসবি কেবল প্রয়োজন যার মাধ্যমে প্রোগ্রামটি বোর্ডে পাঠাতে পারি।
সহজ ভাষায় বলতে, মেগা 2560 রেভিশন 3 হচ্ছে একটি বড় ইলেকট্রনিক্স বোর্ড যা প্রোজেক্টে বেশি কম্পোনেন্ট যুক্ত করতে দেয়। এর মাধ্যমে প্রোগ্রাম লেখা এবং বিভিন্ন ইলেকট্রনিক উপাদানে যোগাযোগ করা সহজ হয়।
Technical Specification:
| Microcontroller | ATmega2560 |
| Operating Voltage | 5V |
| Input Voltage (recommended) | 7-12V |
| Input Voltage (limit) | 6-20V |
| Digital I/O Pins | 54 (of which 15 provide PWM output) |
| Analog Input Pins | 16 |
| DC Current per I/O Pin | 20 mA |
| DC Current for 3.3V Pin | 50 mA |
| Flash Memory | 256 KB of which 8 KB used by bootloader |
| SRAM | 8 KB |
| EEPROM | 4 KB |
| Clock Speed | 16 MHz |
| LED_BUILTIN | 13 |
| Length | 101.52 mm |
| Width | 53.3 mm |
| Weight | 37 g |
Arduino Mega 2560 হল একটি মাইক্রোকন্ট্রোলার বোর্ড যা ATmega2560 এর উপর ভিত্তি করে। এটিতে 54টি ডিজিটাল ইনপুট/আউটপুট পিন রয়েছে (যার মধ্যে 15টি PWM আউটপুট হিসাবে ব্যবহার করা যেতে পারে), 16টি অ্যানালগ ইনপুট, 4টি UARTs (হার্ডওয়্যার সিরিয়াল পোর্ট), একটি 16 MHz ক্রিস্টাল অসিলেটর, একটি USB সংযোগ, একটি পাওয়ার জ্যাক, একটি ICSP হেডার, এবং একটি রিসেট বোতাম। এটি মাইক্রোকন্ট্রোলার সমর্থন করার জন্য প্রয়োজনীয় সবকিছু রয়েছে; এটিকে একটি USB কেবল দিয়ে একটি কম্পিউটারের সাথে সংযুক্ত করুন বা শুরু করতে AC-টু-ডিসি অ্যাডাপ্টার বা ব্যাটারি দিয়ে এটিকে পাওয়ার করুন৷ মেগা 2560 বোর্ডটি ইউনো এবং প্রাক্তন বোর্ড ডুমিলানোভ বা ডিসিমিলার জন্য ডিজাইন করা বেশিরভাগ শিল্ডের সাথে সামঞ্জস্যপূর্ণ।
Beginner’s Guide: How to Write and Run Your First Arduino Program
I’ll guide you through writing a simple Arduino program, also known as a “sketch”, and explain how to run it on your computer.
Step 1: Download and Install Arduino IDE
- Go to the official Arduino website: Arduino Software.
- Download the latest version of the Arduino IDE (Integrated Development Environment) for your operating system (Windows, macOS, or Linux).
- Install the software following the on-screen instructions.
Step 2: Connect Arduino Board
- Plug your Arduino board into your computer using a USB cable.
Step 3: Open Arduino IDE and Write a Program
- Open the Arduino IDE that you just installed.
- In the IDE, you will see a blank space for writing your code. This area is called the “Sketch Area”.
- Now, let’s write a simple program that makes an LED blink.
void setup() {

pinMode(13, OUTPUT); // Set pin 13 as an OUTPUT

}
void loop() {
digitalWrite(13, HIGH); // Turn on the LED
delay(1000); // Wait for 1 second
digitalWrite(13, LOW); // Turn off the LED
delay(1000); // Wait for 1 second
}
Step 4: Save Your Program
- Click on
Filein the menu, then selectSave As.... - Give your program a name and choose a location to save it. The file should have a
.inoextension (e.g.,blink.ino).
Step 5: Select Your Board and Port
- Go to
Tools>Boardand select your Arduino model (in this case, Arduino Mega 2560). - Go to
Tools>Portand select the correct port (usually something like COM3 or /dev/ttyUSB0).
Step 6: Upload the Program
- Click on the right arrow button (→) at the top-left corner of the IDE. This is the “Upload” button.
- The IDE will compile your code and send it to the Arduino board. You’ll see messages at the bottom indicating the progress.
Step 7: Observe the LED
If you’ve connected an LED to pin 13 on your Arduino board, it should start blinking on and off.
Congratulations! You’ve successfully written and uploaded your first Arduino program. Keep exploring and experimenting with different codes and components!
We provide the best in class arduino products in all over Bangladesh. If you looking for the best price we win in the category of the best product with the best price. So if you are looking for the best arduino price in Bangladesh with the best quality of arduino in Bangladesh we are the best choice for you.
Reviews
There are no reviews yet.